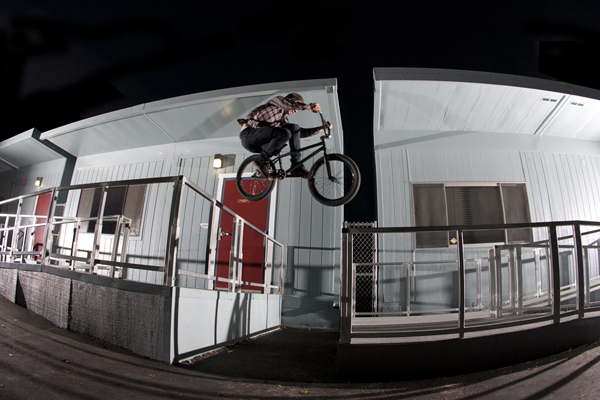
It’s no mystery that when you get to a certain level in the photography game one of your goals is most likely going to be to sell some of your photos. It’s a pretty rad feeling and it never gets old to be honest. I have been selling photos for quite some time now and it’s always an amazing feeling when someone pays you for something that you created. If you feel like your work is on par with what you see in the magazines then that might be a sign you are ready to start putting a price on your work. If you are looking to get some inside advice to help you get your start or just curious as to how the process works keep on reading.
A lot of the times when I sell photos I often end up sending low-res samples to the company that the rider is sponsored by. For example, if I recently shot with a rider that rides for a company like Profile, I would send an email over to them and see if they are interested in the photo. If they are, they will hit me back and ask me what I am looking to get for it. Then it comes time to break down the amount of work that I put into it in my head and name a price. I guess it varies depending on what they want to use it for and it depends on my relationship with the company as well. When it’s going to be for ad use, I tend to charge a little bit more but that’s just one of the things you need to figure out on your own, everyone does it their own way. Naming your price gets a little tricky and needs to be handled with care. You don’t want to sell your work short and give it away for too little but you don’t want to name a price that is so high it scares the company off. Find a good middle ground and see where it goes from there. Also, don’t be scared to negotiate. It’s all part of the process and you will pick up on that the more you sell. There are also times where I will get an email from a team manager/art guy or company owners asking if I have photos of certain riders that ride for them. That is the example I am going to be focusing on for this feature.
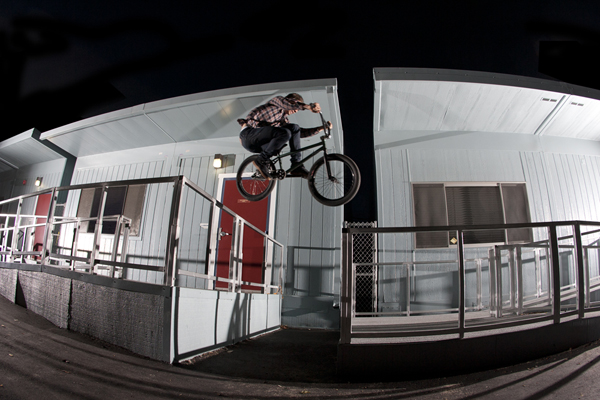
One day I woke up to an email from Harrison Boyce telling me that MacNeil team rider Jeff Kocsis was due for an ad and I had just recently shot with Jeff around that time and he put in a good word letting Harrison know that he was stoked on one of the photos we shot. I ended up sending a low-res sample to Harrison and he let me know soon after that they were into the idea of buying the photo. At this point, I sat down and edited the photo the way I wanted it to look, cleaned it up and got it re-sized. I typically re-size the photos to 14.6 inches wide by 9.733 inches tall at 300DPI. I also recommend saving the full-size files as .TIF files. Since I knew the photo was on deadline and going to print quickly it helps to have the shot fully ready to go so that the art director/layout artist could collab and dial in an ad based around the photo that is aesthetically pleasing.
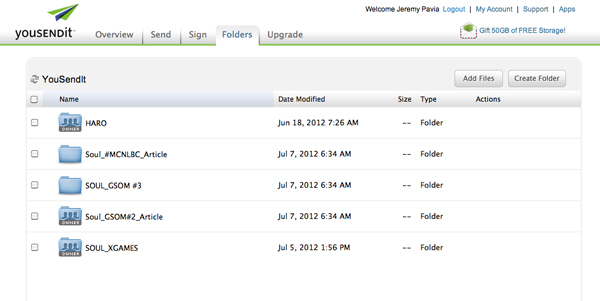
If you are sending the photo through the web usually the file size is huge especially for a high-res, edited photo and most email hosts can’t handle the large sizes. This is where websites like YouSendIt.com come into play. Basically you can send files that are massive and even create entire folders to share if you happen to be sending a sequence for example or just a shit load of photos at once. I just recently sent over 100 photos to Soul Magazine from this past X Games and had to create a specific folder and then give the editor access to the folder so he could download them. Sometimes I will also burn a DVD just so the company has a hard-copy as well but a lot of times people need the photos as soon as possible and deadlines need to be met so yousendit is a life-saver in my opinion. Also, the company’s can easily burn the downloaded images to a DVD anytime. So, anyways, once I had the photo ready to go I sent it over to Harrison along with an invoice.
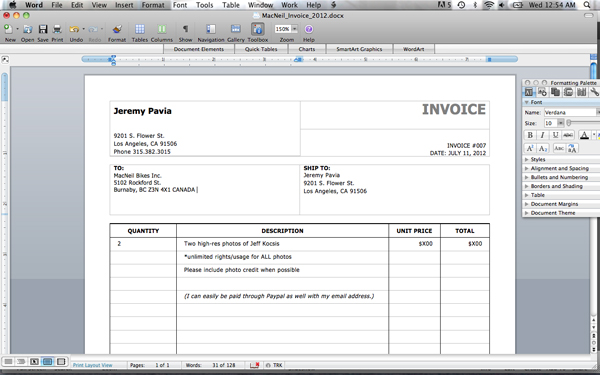
Most of you are probably wondering how to create an invoice or might get a little nervous when it comes time to write one up but it’s easier than you might think. I have actually been using a simple word file template for my invoices for years. Click here to see the invoice full size. Obviously the info has been changed to respect everyone’s privacy and personal business but this is the exact invoice that I sent over to them along with the high-res photo. You need your name and address, the companies name and address, what you are selling, and for how much. I also include that the photos are being sold for unlimited rights/usage otherwise known as a full buyout. This just means that once the photo is purchased it is theirs to use for print ads, online promotion, catalogs, or whatever else they can come up with. Other than that you might want to add some special notes/instructions and I often ask the company to include photo credit if possible. Not all companies do and it’s up to them especially after you sell the photo outright. It’s not a big deal and I have had plenty of photos without my name on them but it’s always cool to see that photo credit shout-out some where in the ad. I also throw in all of my contact info and cell number in case they need to get a hold of me at any time. A quick Google search for “Microsoft Word invoice template” can get you set up creating invoices in minutes.
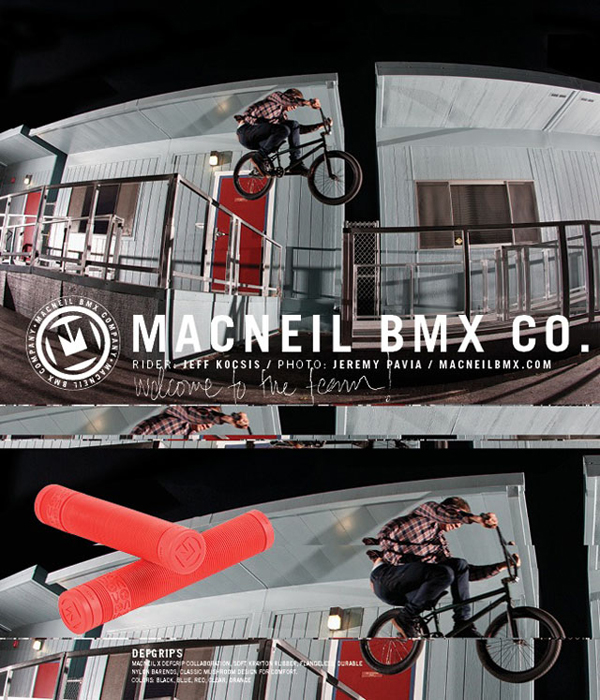
It’s always interesting to send a photo off then wait and sit back to see what the company comes up with and how they use it. I knew from the beginning that this particular photo was going to be used for a print ad in Ride Magazine but didn’t actually see the ad until I got the magazine in the mail. Sure, I could have asked to see a PDF of the ad before it got printed but at that point, it’s out of my hands and with a company like MacNeil working on it, I knew it was going to turn out good. Needless to say I was pumped to see how the ad came together and basically that’s that. They got their photo, built their ad and got it sent off in time to make the deadline for the mag. On my end, I got paid and everything worked out smoothly.
So lets break it down into steps.
STEP ONE- Shoot a photo that you think is good enough to sell.
STEP TWO- Send out some low-res samples to see if any companies are interested in purchasing it. If you get a company that is interested negotiate your price and come up with something that you feel is fair for both parties involved.
STEP THREE- Get it edited/re-sized and ready for print.
STEP FOUR- Create your invoice and send it over as soon as you send over the high-res photo.
STEP FIVE- Sit back and wait. Be patient and don’t hassle a company too hard about your invoice. There are times where it could easily take a week or two to get paid and you don’t want to annoy them with emails asking where your check is. Play it cool and if it really seems to be taking way too long then I would definitely throw out a friendly reminder.
STEP SIX- Get your money, re-invest it into more (better) camera gear and get right back out and shoot more sellable photos. Repeat that cycle as often as possible and you will be good to go.
Good luck and I hope that this weeks feature helped shed some light on a not-so-often talked about subject. If you have any suggestions for future TTL pieces make sure to leave them in the comments. One of these weeks I will do a reader voted column depending on what you want to see me write about most. Keep an eye out in the future for more exclusive galleries and of course be sure to check back next Wednesday for the twenty-second edition of Through the Lens. As always feel free to leave any questions in the comments section or email me at info@jeremypavia.com and I will hit you back as soon as I can. Feel free to follow me on Twitter and Instagram @jeremypavia.
Don’t forget to become a fan of The Union on Facebook and follow us on Twitter @BMX_UNION!
Want to check out past editions of Through The Lens? Click below…
