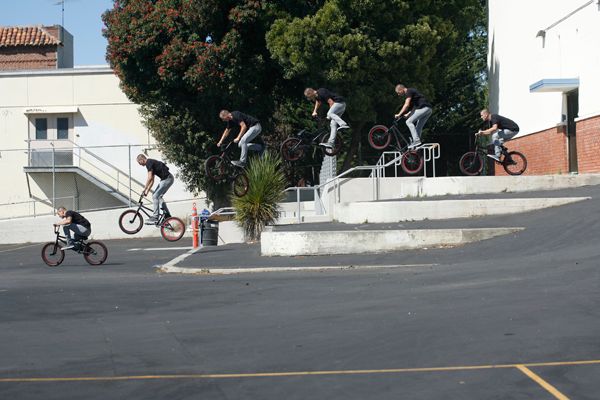
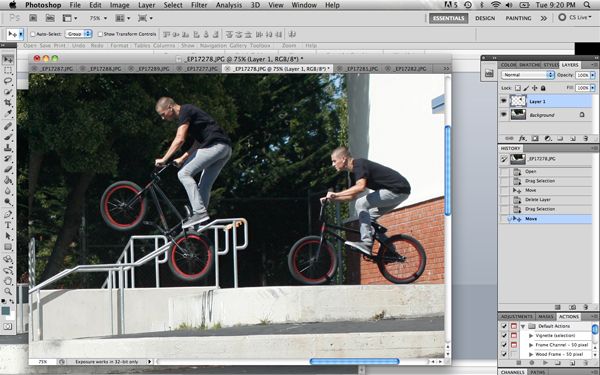
This is something that every BMX photographer should know how to do. With riding getting more and more tech/combo based on the daily knowing how to create a seamless sequence is incredibly beneficial to anyone behind the lens. All you need is a DSLR that can shoot sequences, a tripod and Photoshop. The cool thing about shooting seamless sequences is that you can really show a trick in a different way as opposed to with a still shot. Sometimes a single shot just doesn’t do the trick justice. That was the case with this photo of Kevin Kiraly whipping down the famous Wallenberg set. I really wanted to show the length of this whip and after looking at many angles, the side view seamless really stood out to me as the best way to show the entire trick and really try to give it as much credit as it deserves. As a photographer you should always be looking to tell some sort of story with your photos and sometimes a seamless sequence can help do just that. Also, I want to point out that this is the way that I personally put together a seamless sequence and the way that I have found works best for me. Everyone edits a little differently and there are many different ways to get to the same end result. Hopefully this all makes sense and inspires you to get out and shoot as soon as possible to try out these steps for yourself. Let’s get started.
Don’t forget to “Like” and Tweet this if you are into it!
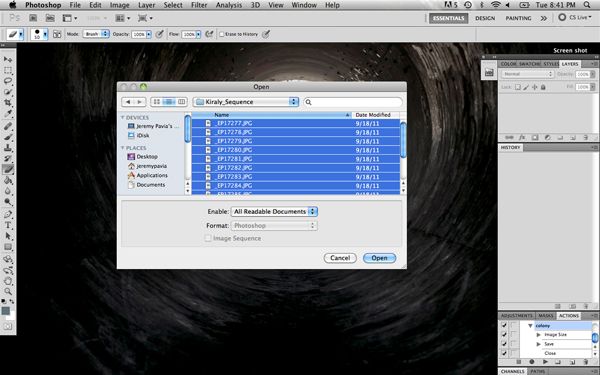
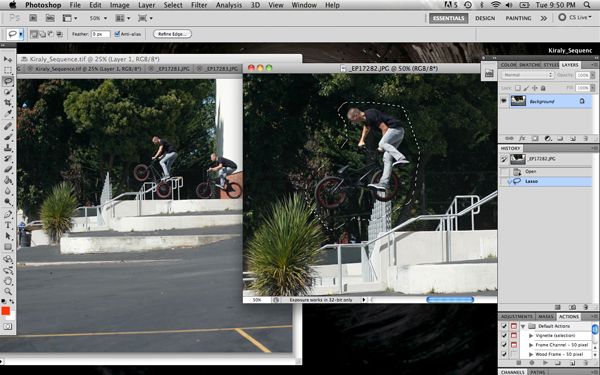
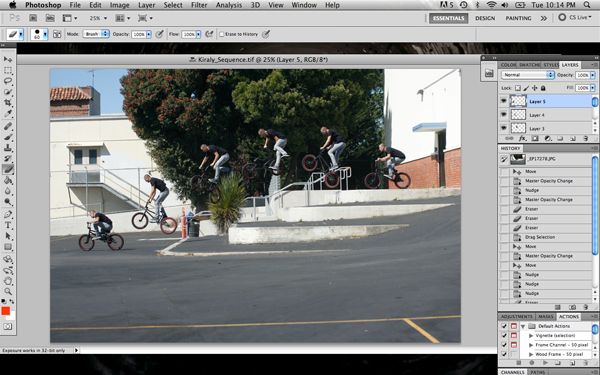
Step One: The first step is to open up all of your images in Photoshop. You can use pretty much any version including much older ones to do this but just food for thought I am using CS5. Open up the entire sequence whether or not there are ones you may or may not need. You won’t know which ones will make the final cut until you start putting the sequence together so just open them all up and go from there.
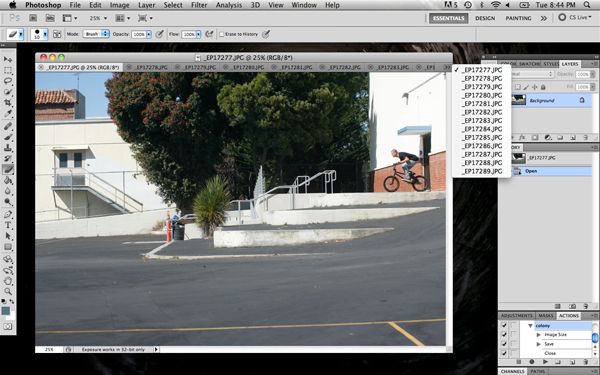
Step Two: Start with the first file in the sequence and use that as your “base” photo to work off of. You can obviously use any of the photos to start with but for the sake of keeping things easy to follow start with the beginning of the trick.
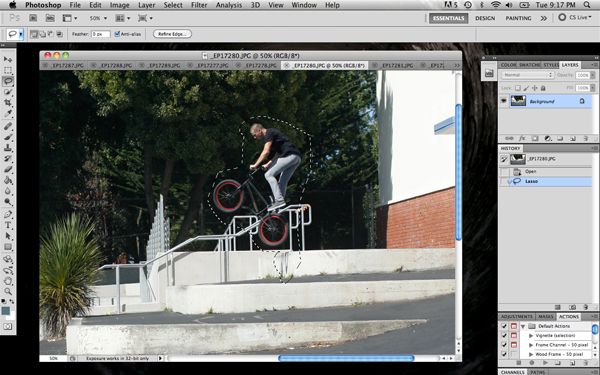
Step Three: Take the second image in the sequence that you want to use and with the lasso tool select a tight crop around the rider themselves and nothing else. If there is a shadow on the ground from the rider be sure to include that as well. You can get as close as you want but don’t worry about trying to outline the rider too perfectly. Once you have your selection made, move on to the next step.
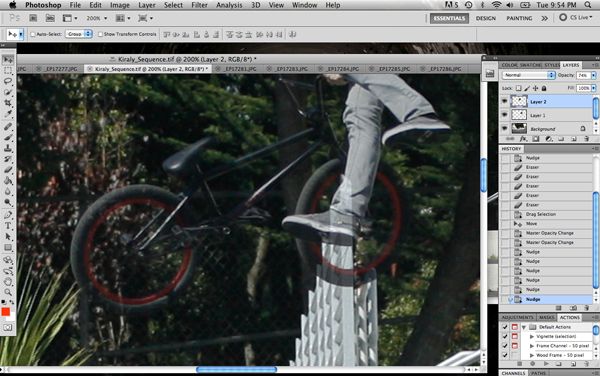
Step Four: After your selection is made, click on the arrow tool and drag it over to the top of the first image. Once you have it laid down start to line it up as best you can using points of reference from the photos. The slightest bit of movement you made while shooting will show up in the photo and become obvious when you start putting it together but there are ways to make sure you can work with what you have within reason so don’t worry if it’s not perfectly matched up.
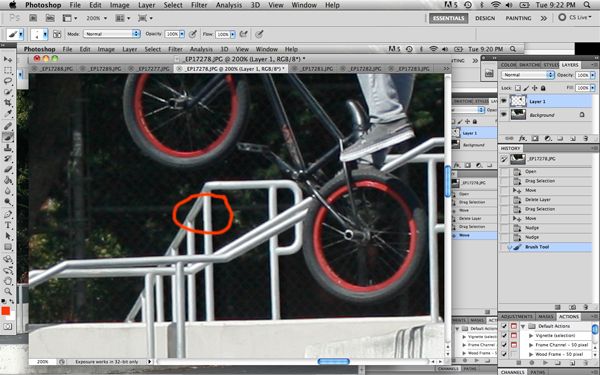
Step Five: Zoom in on the photo to 100-200% or enough to where you can see very close up and then go over to the layers palette and click the eyeball, which turns that top layer on and off. This will show you how accurately the photos are lining up. You can then use the arrows on your keyboard to match them up as best you can, as each movement with the arrows is very minimal. In this case, I highlighted the spot where the photos were off a bit on part of the rail. You can tell it’s not perfectly matched up. This is quite common seeing as how shooting a sequence on a tripod still doesn’t guarantee that there will be zero movement between frames but it sure does help.
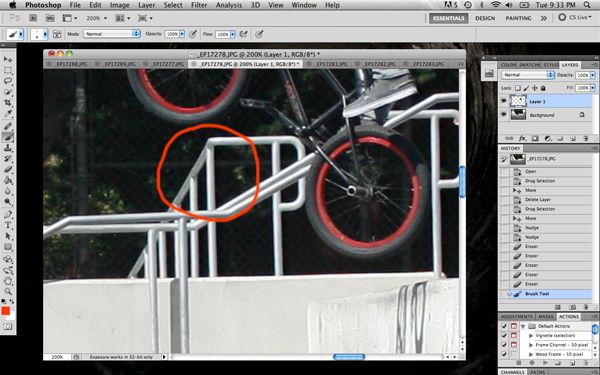
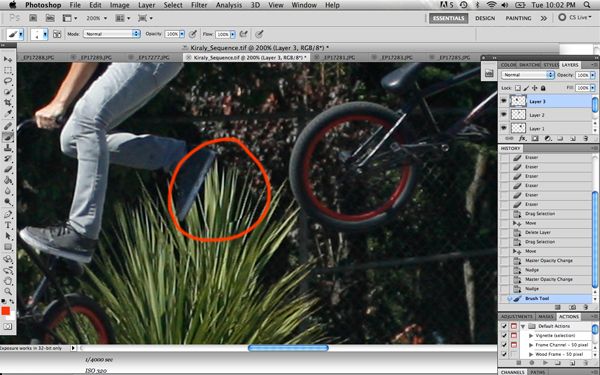
Step Six: When you see any spots that seem off, go ahead and take the eraser tool and erase right over those spots. Keep in mind that the base photo is your main photo and that is what you want to line every other photo up with. Be extra careful not to erase any part of the rider or his shadow. Once you erase the spots that seem a bit off, go ahead and click on the layer again making it visible and invisible going back and forth. If you did what you were supposed to, you shouldn’t see any movement between the two frames. Anywhere you do see movement, erase over it until just the rider shows up. As you can see in the photo the rail now lines up perfectly.
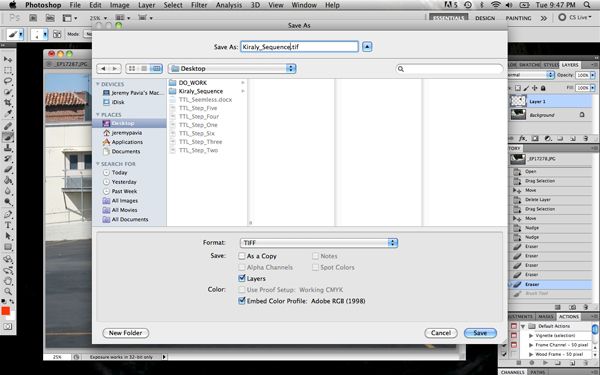
Step Seven: Once you have that layer completely dialed in I would go ahead and save the image. Don’t flatten the image yet, just save it layered for now. You never know when Photoshop is going to quit on you and all it takes is one time to ruin your day so be smart and save, save, save.
Step Eight: Repeat steps 4 through 6 until you have your sequence all laid out. Be sure to pay extremely close attention to detail and make sure that things are lining up perfectly. Remember to turn the layers on and off until you can’t see any imperfections between the layers.
Step Nine: This is more of a tip than anything but when you are doing the detail work and lining up the two layers turn the opacity of the top layer down to about 50% or so. What this will do is let you see through the photo and see exactly how it’s lining up. Once you have it lined up as best you can turn the opacity back up and check your work.
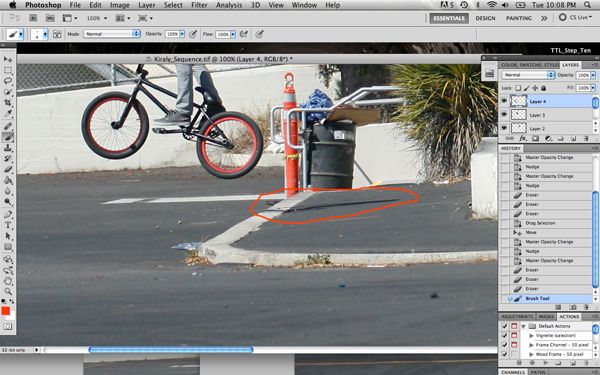
Step Ten: This one is a reminder to look close. Zoom in as far as you need to making sure you don’t miss out on any details. When you look at this photo zoomed out at 100% chances are you would never notice the plant being off slightly but when you zoom in, you can clearly see some of the leaves are not matching up. This is a good example of the slight changes you can expect no matter how still you stay while shooting. If it’s windy, expect some imperfections. Don’t sweat it though, a little bit of fine-tuning and everything should line up.
Step Eleven: When it comes to putting together a seamless sequence it’s all about the details. Look closely at the shadow in the red circle. If I forgot to add that shadow in there surely 99% of people wouldn’t notice but I would and it would really piss me off. Go back and forth between layers 50 times if you have to just to make sure there are no differences between the two. Oh yeah, you should have saved your work again multiple times by now. Seriously, it’s very important to get into that habit so start now.
Step Twelve: When you get to this point, you are pretty much done. All you need to do now is go back layer by layer and double check your work. If you click on every single layer one by one and everything lines up, you are good to go. If I were you I would save one layered copy and one flattened copy. I have flattened images before, saved them and realized later down the line that there was part of the photo that just didn’t line up and it’s a pain in the ass to fix, especially if you have done any editing after the fact. So, just be sure to have a back up just in case.
The end result should be just as the title suggests which is seamless. Don’t expect every photo you shoot to come out perfect and always be prepared to make mistakes and learn from them. Now take what you have learned and go put it to use!
Although some of this may seem a bit overwhelming keep in mind that every editing technique takes time to dial in. I have been editing photos for over ten years now and I still learn new things on a regular basis. A huge part of trying to be a successful current day photographer is keeping up on what’s new in the world of editing and experimenting with different looks. You never know what you might come up with or be inspired by so always keep an open mind. Be sure to check back next Wednesday for the twelfth edition of Through the Lens and as always feel free to leave any questions in the comments section or email me at info@jeremypavia.com and I will hit you back as soon as I can. Also, feel free to follow me on Twitter and Instagram @jeremypavia.
Don’t forget to follow The Union on Twitter @BMX_UNION and “Like” us on Facebook!