BMX UNION

The latest BMX Videos, Products and News!

  • BMX Videos & News
  • BMX Color App
  • Submissions
  • Home
  • Spoke Calculator
  • Products
    • BMX Frames
    • BMX Bars
    • BMX Fork
    • BMX Stem
    • BMX Grips
    • BMX Headset
    • BMX Cranks
    • BMX Pedals
    • BMX Sprocket
    • BMX Chain
    • BMX Bottom Bracket
    • BMX Seat
    • BMX Seat Post
    • BMX Hubs
    • BMX Rims
    • BMX Tires
    • BMX Pegs
    • BMX Hub Guard
  • Featured
    • Interviews
    • Bike Check
    • BMX Videos
    • Photogalleries
    • BMX Reviews
    • On the Horizon
    • Through The Lens

Odyssey BMX – EVO 2.5 Brakes & Kit

June 13, 2018

Odyssey have released an updated version of their popular EVO 2 brakes!

Odyssey BMX EVO 2.5 Brakes

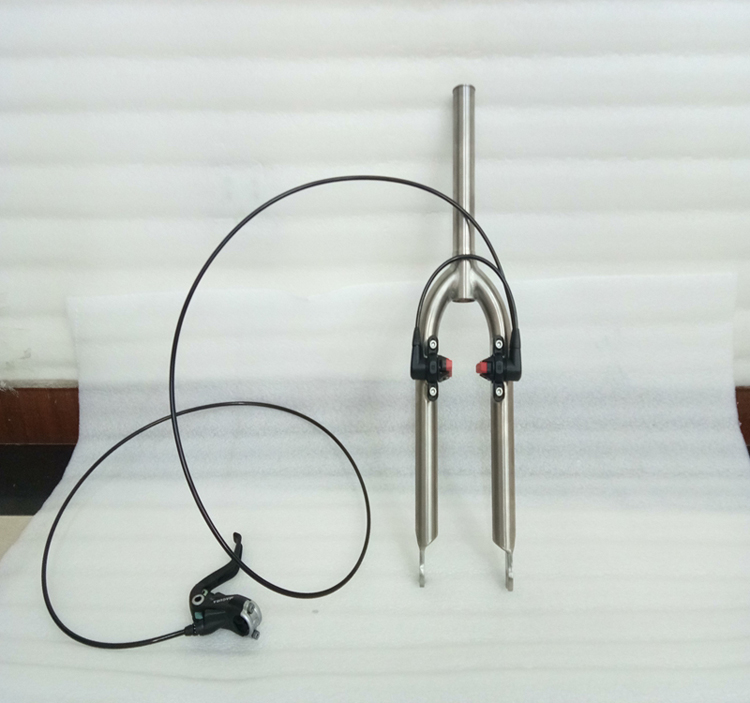
Sure, brakes aren’t as common as they used to be on BMX bikes, but there’s still a good number of riders that rock brakes! The crew at Odyssey have just released an updated version of their ever popular EVO 2 brakes, with arms that have a wider radius to fit the larger 2.40″ tires. They’ve also created a kit with the EVO 2.5 brakes, their Monolever brake lever and the Linear Slic-Kable brake cable. Get full details below…

Odyssey BMX EVO 2.5 Brakes

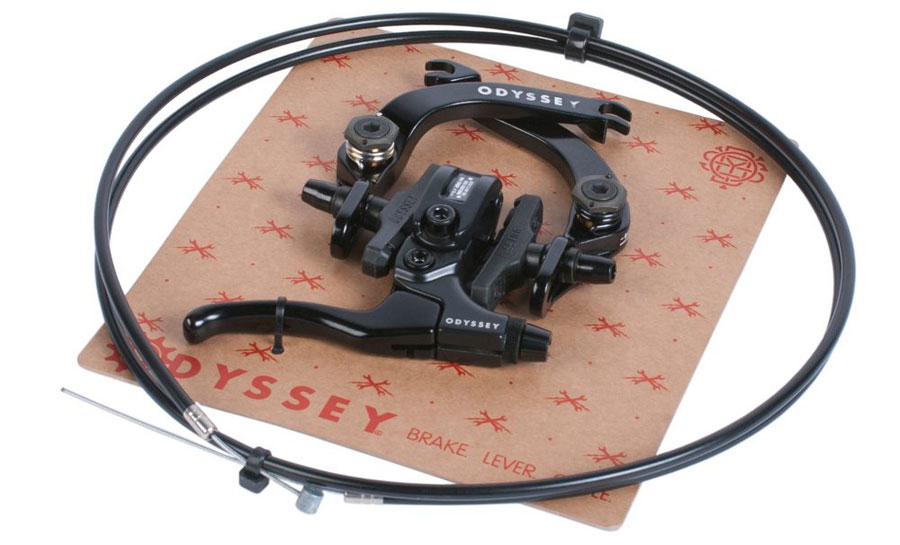
“The Evo 2.5 is a remixed version of the industry leading Evo 2 brake you know and love, with a lot more room for larger, modern tire sizes. Just like the classic Evo 2, it is built around modular hardware features and affordable value. Install it as a rear brake or front brake straight out of the box.

Comes with Odyssey’s convenient double lugged straddle cable, custom curved cable hanger and an array of hardware for adapting the brake to every possible set-up. Forged from aluminum for strength, and to avoid unnecessary upcharges from frivolous CNC machining.
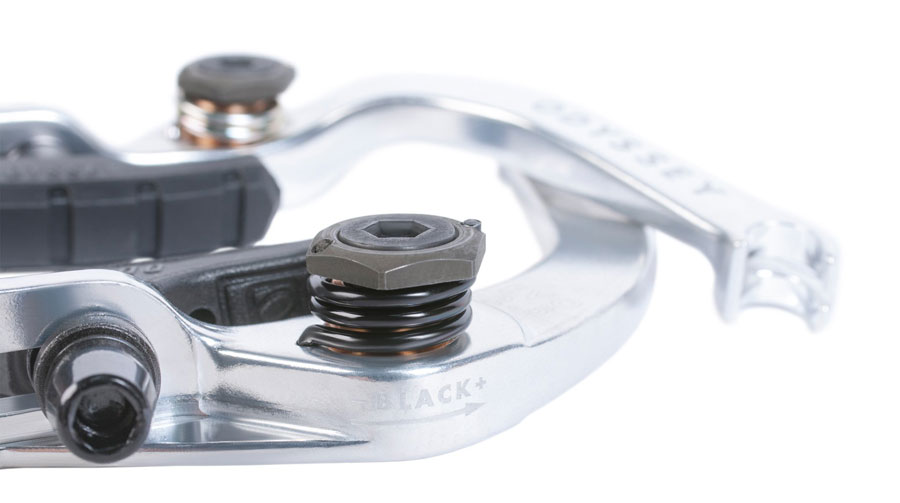
Odyssey BMX EVO 2.5 Brakes

Features
– More clearance for larger tires
– Flat-tipped cable set screws prevents excess damage to the cable’s inner wire
– Sleek aluminum front cable adapter
– Flush surfaces, with the lowest possible overall stack height
– Front or rear wheel use
– Slim by Four pads
– Two sets of springs for hard and soft tension/modulation
– Spring tension indicators for easy set up
– Newly designed straddle hanger
– Pre-lugged straddle cable
– Cable lugs are smaller and use a 10 mm hex head
”

Odyssey BMX EVO 2.5 Brakes

Odyssey BMX EVO 2.5 Brakes

The EVO 2.5 Brakes are available for $46.99 and the whole kit is available for $66.99 through BMX shops and mail-orders that carry Odyssey BMX worldwide now!

Ultimate BMX Brake Hack and Tip Guide

April 11, 2018

Brant Moore put together the ultimate BMX brake hack and tip guide…

If you run brakes, you probably love them and love making them work better. Brant Moore has been putting videos together for a while now teaching you how to fix your brakes and how to do some custom tricks to make your brakes work better. Instead of having 4 different videos, he put together a single video showing you his brake setup with the tricks and tips that he’s covered in past videos, plus a little more info, so you can get your brakes working amazing. Take a peek, then find the more in-depth videos from before below…

“Throughout the years I’ve made many tip videos about ways to improve your bmx brakes, but I’ve never put them all into one comprehensive video. This is that video.

A BMX brake check covering everything I do to make my brakes the best they can be.

Video Topics Covered In Order
1:24 – Snafu Astroglide Cables With Odyssey Monolever

1:39 – Single Cable Inner For Dual Upper Gyro Cable

8:24 Lower Cable Knarp Setup –

12:12 How To Adjust BMX Brakes – ”

Alright, so Brant has given you a TON of advice and tricks to dialing in your brakes and make them work amazing. Go throw a set on your bike and get creative!

Hydraulic Brakes On A BMX Bike?

February 7, 2018

It’s always interesting seeing how people take ideas and create it. Jimmy Biondi wanted to see if he could get hydraulic brakes on his bike…

Hydraulic BMX Brakes

We know… We know… Everyone rides brakeless these days. Actually, not everyone! There’s still a good number of riders out there that run brakes and love them. Over the years, BMX brakes haven’t changed a whole lot, though. We’ve seen the same style of U-Brakes, V-Brakes and even a brief run in with disc brakes that lasted about two minutes over the years, but we haven’t seen much when it comes to hydraulic brake systems. Jimmy Biondi decided he wanted to try it out to, so he spent a year and about $600 to figure out how to get a set of Magura Rim Brakes to work on a custom Titanium fork with mounts. The process was a little more complicated than expected, but in the end he ended up with a crazy brake setup that he likes a lot and could be easier to maintain than traditional BMX brakes with springs. You can learn all about how he did it over on Flat Matters where he talks about the motive, the process, hurdles that he had to jump and more. It sounds like he’s already starting to play around with figuring out how to get hydraulic rear brakes using a hydraulic rotor that would all the bars and bike to spin without cutting off the flow of oil. If you’re a design, product, BMX nerd… This is definitely worth a peek!

Anyone else ever played with hydraulic brakes on a BMX bike or have seen anyone else do it? What are your thoughts on this? Let us know in the comments below!

Colony BMX – How To Install Brake Levers

February 5, 2018

Need some advice on how to install a brake lever like the Colony Brethren brake lever?

Now, brakes aren’t as common as they used to be, but that doesn’t mean there aren’t a lot of riders out there that still run brakes. It seems like a common response to why riders don’t have brakes is because they take a bit of work to get them dialed in, which is understandable. Brakes can be tricky. However, you won’t learn if you don’t try. Colony BMX just posted up this quick video showing you how to install their Brethren brake lever that is one bolt and you’re good to go. This is one for the riders just getting into BMX, learning how to work on their bikes.

“Detailed look into how to install the Colony Brethren Brake Levers. Any questions feel free to leave in the comments and we will do our best to answer them.” – Colony BMX

Your Brakes Suck? This Could Be Why!

September 19, 2017

Do your brakes suck? This video Brant Moore just uploaded could help you out!

Anyone who has ran brakes on their BMX bike knows that dialing in your brakes can be tricky, and keeping them perfect can require a bit of maintenance. Brant Moore has been putting out a number of videos showing your how to dial in your brakes lately and this is another perfect example. Hit play to let Brant show you a trick involving the bushing on your brake lever that you could have overlooked while dialing in your brakes.

If this video doesn’t solve your problem, maybe you could use some tips on how to properly tension your BMX brakes!

How To Properly Tension BMX Brakes

September 5, 2017

Although brakes on BMX bikes might not be as common as they used to be in the early 2000’s, there’s a good chance a number of you out there might be interested in knowing now how to properly tension BMX brakes. In fact, not understanding how the tension works is probably why a number of riders end up taking their brakes off in the first place. We don’t blame you, it can be a little tricky and a real pain. Brant Moore decided it was time to put together a video explaining how BMX brakes actually work, and how to properly tension BMX brakes so you have the perfect brakes. Hit play on the video below…

“Brake springs are the main reason good brakes feel good and bad brakes feel bad on a bmx bike.
In this video I talk about why they matter and how to use them properly.
” – Brant Moore

Did this help you understand how to properly tension BMX brakes? Do you still have questions? Let us know what is on your mind in the comments below! We’ll be glad to answer your questions on dialing in brakes since we would love to see more riders rocking brakes and doing brake tricks again!

Colony BMX – How To Install Gyro Cables

April 18, 2017

Colony coming through with a fresh How To video explaining how to properly work on your bike. This time around they focus on properly installing gyro cables, also known as detangler cables. Brakes might not be as common, but it seems like most of the time it’s because riders just don’t care to, or understand how to, work on brakes. This video shows that it’s not as difficult as it might seem! So, if you want to learn how to properly install your brake cables on a gyro, this is the video for you! Take a peek!

“Today we run you through how to setup Gyro cables for your bike. Any questions just leave them in the comments section.

Products featured:
Upper Gyro Cables
Lower Gyro Cables
RX3 Rotary Detangler
Brethren Brake Lever
Brethren Brakes
”

Colony – How To Install and Adjust BMX Brakes

September 4, 2016

BRAKES? What are those things? Even though a number of BMX riders are brakeless these days, there are still a number of you out there that run brakes, or wish they knew how to properly install BMX brakes. In fact, one of the most common reasons we hear from people as to why they ditched their brakes is because they don’t know how to maintain them or how to properly set them up in the first place.

Although BMX brakes can seem (and actually be) a little bit complicated, it’s not as hard as it may seem. Colony dropped this quick how to video showing you how to install front brakes, which is the same as the back.

The video shows you how the arms are designed to go with one specifically on the bottom and one on the top. After that, you need to make sure you have the right spring on the right side and the left spring on the left side. This is important because if you put the springs on backwards, you will just cause the spring to stretch and push the brake pad into the rim, versus pull it away from the rim. This tension is needed to ensure the arms will spring back away from the rim when you let go of the lever.

After the springs are properly in place, you will want to adjust each arm until they’re balanced with the same amount of tension and pull. One misconception is that you have to crank the springs tight, but in all actuality, you really don’t need much more than a quarter of a turn at most usually. This is also preference, as well. Some like a firm smooth pull, and some like a little softer pull, so you’ll want to play with the adjustment a little to find your perfect spot.

Once you have your brakes in place and tensioned properly, you can use the barrel adjuster on the cable or at your lever to help adjust the arms in and out to the perfect spot. Once again, this is personal preference. Some like little play and some prefer to have a little more room to allow them to feather the brakes for manuals for example. If your brake pads are far away from the rim and you pull the lever and there’s little brake pad contact or not much pressure on the rim, you can adjust your barrel adjuster all the way in, then loosen the grub screw holding the cable in place at the bridge. For example from this video the side without the barrel adjuster, you can see the cable hanging out a bit… Just loosen that and pull a little more of the cable through. Usually you don’t have to pull the cable too much so try and pull it a few millimeters then tighten it down and test, repeat if necessary until you get your arms closer to the rim, allowing for proper contact and pressure to lock the wheel up.

Colony didn’t cover adjusting the brake pads in this video, which is a very key part to installing brakes. The brake pads are designed to curve with the rim, so make sure the pads are on properly, then you will want to make sure all of the pad is on the rim and not touching the tire. The trick to adjusting brake pads are to slightly “toe in” the pad so that one end of the brake pad makes contact before the other end. This allows you to feather the brakes, it also can help prevent some of the squawking that can happen, especially on chrome rims with soft rubber pads (clear pads for example).

Once you have the brakes installed, the springs properly installed and tensioned, the cable and barrel adjuster set to your personal preference and the pads adjusted, you should be good to go. Fufanus, abubaca’s and nose picks will be in your future.

It can seem a lot more complicated than it is, but once you know what you’re doing it’s a lot easier. If that still doesn’t make sense, you could always take your bike to your local bike shop and a properly trained mechanic can dial you in as well.

We want to hear from you! Let us know what you think in the comments below!

VISIT: FRONT PAGE // DAILY SECTION // BMX COLOR APP // BMX VIDEOS // RANDOM // BMX Games

  • « Previous Page
  • 1
  • 2
  • 3
  • 4
  • Next Page »
Home
Daily BMX Videos & News
BMX Color App
BMX Spoke Calculator
Submissions
Advertise
What Is BMX? What Does It Mean?
What Does A Warranty Cover?
BMX Frame Geometry Guide
BMX Handlebar Geometry Guide
BMX Tool Guide
BMX Multi-Tool Guide
BMX Frame and Parts Guide
5 Keys To Keeping Your BMX Bike Dialed
Rad - Full Movie
Privacy Policy
Affiliate Disclosure
Join Our Email List
Affiliates & Supporters
Vans
Etnies
Dan's Comp
Life Brand
Note: This site contains affiliate links and we could receive a small commission that supports this site if you were to make a purchase on their websites using our links for no extra charge to you.

Copyright © 2026 · BMX UNION - All Rights Are Reserved.

pixel